Seeing as there has been a lot of questions going around regarding pitched roofs, we decided to put the issue to bed. Yes, pitched roofs can be created automatically in Palette CAD, and below you can find out just how easy it is to do.
Creating pitched roofs automatically
- Activate the wall's Intelligence dialog box by double-clicking on the wall
- Or select “Wall and interior fittings” in the object controller
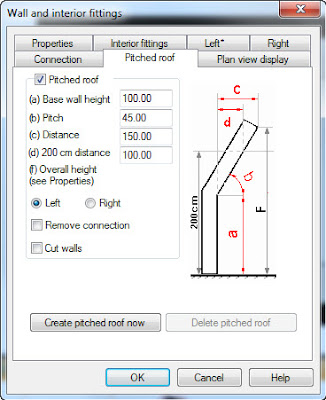
- This opens the “Wall and interior fittings” dialog box
- You can create a pitched roof in the "Pitched roof" tab
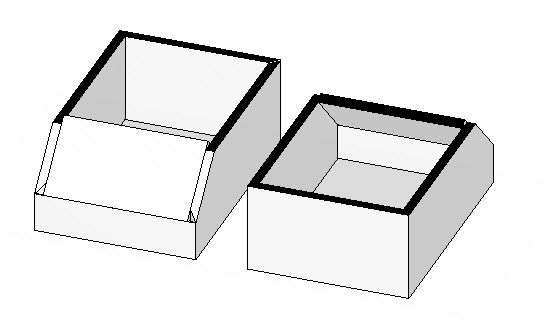
- A pitched roof is an additional (inclined) wall which you can edit just like you would a “normal” wall
- The height of the original wall will be reduced to the height of the knee wall
- The pitched roof has the same name as the original wall, except that the suffix "Roof" is added to it
Pitched roof settings
- Knee wall height: Height of vertical wall
- Angle: Angle from the horizontal
- Distance: Indicates how far into the room the pitched roof reaches (i.e., the distance from the vertical wall)
- 200 cm distance: Distance from the wall at a height of 200 cm
- Right/Left: Pitched roofs are generated inwards by default However, since the result is not always correct because the inward direction might not be clear, the direction can be changed
- In the Plan View window, an arrow indicates the direction in which the pitched roof is being generated
- Remove connection: The connection to neighbouring walls is removed automatically with this option
- The removal of the connection causes the angled mitre cut between the walls to be omitted
- Cut walls: With this option, the two walls adjacent to the pitched roof on the left and the right are cut off at the outside edge of the pitched roof - the connection to the adjacent walls is not removed with this option
- If further walls are to be adapted to the pitched roof, they must be cut off manually
- This cut causes a small, empty “gusset” to be created outside in the corners of the walls
Editing pitched roofs
- If a pitched roof needs to be wider than the knee wall (because the neighbouring walls are inclined, for instance), activate the pitched roof's Intelligence dialog box and change the length accordingly
- Deleting a pitched roof: Activate the knee wall's (the vertical wall's) Intelligence dialog box and disable the "Pitched roof" field in the Pitched roof tab.
Placing roof windows
- Windows are set in a pitched roof exactly the same way they are set in a vertical wall
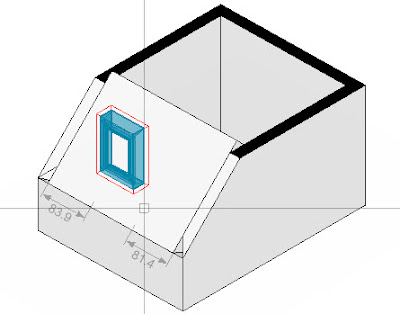
- Place the window in the Plan View or the Axonometric View above the pitched roof
- The position of the window is indicated by the dimension arrows
- Once the window is set, it will be automatically installed into the pitched roof
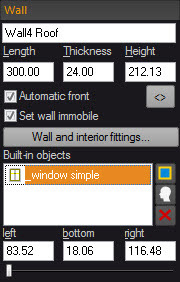
- Positioning a window in the pitched roof: The easiest way is by using the object controller for the wall
- Select the pitched roof
- Select the skylight window in the object controller
- The object controller will show input fields for the distance from the left and right and from the bottom edge
- As an alternative, you can also use the “Interior fittings” tab in the wall’s intelligence (“Wall and interior fittings” dialog box)
There it is, doesn't get much simpler than that.

Here a little treat from Joceline, one of our user who sheared this gem in our Facebook group. Check it out for inspiration or tips from other users to get you on your way to designer super-stardom in 2016. Have fun with it!
Greeting from Stuttgart,
Your Palette CAD Blog Team